http://stackoverflow.com/questions/30896231/why-convenience-keyword-is-even-needed-in-swift
http://stackoverflow.com/questions/25126295/class-does-not-implement-its-superclasss-required-members/32108404#32108404
Designated Initializers and Convenience Initializers in Swift
https://theswiftdev.com/2015/08/05/swift-init-patterns/
http://www.codingricky.com/construtor-chaining-in-swift/
Initializers fall into two categories, Designated and Convenience.
Designated Initializers
Designated initializers are the primary initializers and are responsible for initializing all properties of a class. So in this case, the only initializer here is known as the Designated one.
|
1 2 3 4 5 6 7 8 9 10 |
class Person { let name: String let age: Int // designated init(name: String, age: Int) { self.name = name self.age = age } } |
Now if you want to add other initializers to make use of the Designated one, they will be known as Convenience initializers. So let’s add one that defaults the age. Convenience initializers have the keyword convenience before them.
|
1 2 3 4 5 6 7 8 9 10 11 12 13 14 15 |
class Person { let name: String let age: Int // designated init(name: String, age: Int) { self.name = name self.age = age } // convenience, which uses designated convenience init(name: String) { self.init(name: name, age: 100) } } |
Convenience initializers need to delegate to another Convenience initializer or a Designated initializer.
Here’s an example of a Convenience initializer calling another Convenience one.
|
1 2 3 4 5 6 7 8 9 10 11 12 13 14 15 16 17 |
class Person { let name: String let age: Int init(name: String, age: Int) { self.name = name self.age = age } convenience init(name: String) { self.init(name: name, age: 30) } convenience init() { self.init(name: "Homer") } } |
Two Designated initializers, Two Convenience initializers
|
1 2 3 4 5 6 7 8 9 10 11 12 13 14 15 16 17 18 19 20 21 22 23 24 25 26 |
class Person { let name: String let age: Int // designated 1 init(name: String, age: Int) { self.name = name self.age = age } // designated 2 init(age: Int, name: String) { self.age = age self.name = name } // convenience 1, must use one of the designated convenience init(name: String) { self.init(name: name, age: 30) } // convenience 2, must use one of the designated convenience init() { self.init(name: "Homer") } } |
What about subclasses?
Once again, with initializers, there are certain rules that need to be adhered to when subclassing. So Designated initializers must call other Designated initializers in their immediate parent class.
So let’s take a look at an example. We are adding a Student class as a subclass of the Person class. It will add a property student number.
|
1 2 3 4 5 6 7 8 9 |
class Student : Person { let number: String init(name: String, age: Int, number: String) { self.number = number super.init(name: name, age: age) } } |
Here we are calling the Designated initializer in the Person class. If we tried to call one of the Convenience initializers in the Person class, a compile error would occur. Also note, we need to assign the number property before calling the initializer in the parent class as it is a requirement to ensure all properties are initialized in child classes before their respective parent initializer is called.
Designated initializers delegate up and Convenience initializers delegate across.
ref – https://theswiftdev.com/2015/08/05/swift-init-patterns/
NSObject subclass init
If you subclass NSObject you can go on multiple “roads”
Example 1 – inits are designated.
Whether you want to over-ride NSObject’s init, or create your own init, YOU MUST use super.init() at the very end. This
signifies that after initializing all of your properties, you finally call the parent’s (NSObject) designated init.
Also, if you declare a function interface that is the same as the parent, you are overriding it, and must use the override
keyword.
Essentially, when we override a parent’s function, we must 2 things:
1) make sure the function interface is the same
2) init self property, and then call the parent’s over-ridden function
|
1 2 3 4 5 6 7 8 9 10 11 12 13 14 15 16 |
class Apple : NSObject { var color : String init(color: String) { // designated init self.color = color super.init() } override init() { // we use override because it has the same interface as parent self.color = "Red" super.init() } } |
If you want to continue to subclass Apple, you can, but the main rule is that the designated init (super.init(..)) must always
be called in the very end.
|
1 2 3 4 5 6 7 8 9 10 11 12 13 14 15 16 17 18 19 20 21 22 |
class GoldenApple : Apple { var epic : Bool init(color: String, epic: Bool) { // designated init, must call parent designated init at the end self.epic = epic super.init(color: color) } override init(color: String) { // we use override because it has same interface as parent self.epic = true super.init(color: color) } override init() { // we use override because it has same interface as parent self.epic = true super.init() } } |
Convenience
Before, when we override a parent’s function, we must do 2 things:
1) make sure the function interface is the same
2) init own property, and then call the parent’s over-ridden function
Now, we do step 2) differently. We can call our own designated init function instead.
|
1 2 3 4 5 6 7 8 9 10 11 12 13 14 |
class Apple : NSObject { var color : String init(color: String) { self.color = color super.init() } override convenience init() { // call our own designated init function self.init(color: "Red") } } |
We can use convenience in overriding parent functions, or we can use it in our own designated initializers.
Notice that the convenience init calls the designated init.
|
1 2 3 4 5 6 7 8 9 10 11 12 13 14 15 16 17 |
class GoldenApple : Apple { var epic : Bool init(color: String, epic: Bool) { self.epic = epic super.init(color: color) } override convenience init(color: String) { self.init(color: color, epic: true) } convenience init() { self.init(color: "Golden") } |
UIViewController subclass init
We are required to implement the protocol function init(coder aDecoder: NSCoder). Hence, we use a convenience function on a designated init with a NSCoder parameter.
|
1 2 3 4 5 6 7 8 9 10 11 12 13 14 15 16 17 18 19 20 21 22 23 24 25 26 27 28 29 30 31 |
class ViewController: UIViewController { var example : String! required convenience init(coder aDecoder: NSCoder) { self.init(aDecoder) } init(_ coder: NSCoder? = nil) { self.example = "Common init example" if let coder = coder { super.init(coder: coder) } else { super.init(nibName: nil, bundle:nil) } } } class ChildViewController : ViewController { var name : String override init(_ coder: NSCoder? = nil) { self.name = "String" super.init(coder) } } |
Custom UIView
So in our custom view, we first create a initialize function that initializes self properties.
This initialize function will be called AFTER in every init functions.
In example //1, we over-ride parent’s interface init(frame: CGRect). We call the parent’s init function to make sure initialization goes through smoothly.
Then, we finally initialize our own properties.
|
1 2 3 4 5 6 7 8 9 10 11 12 13 14 15 16 17 18 19 20 21 22 23 24 |
class View: UIView { override init(frame: CGRect) { // 1 super.init(frame: frame) // must call parent's function to over-ride it self.initialize() // called last, initialize our own properties } required init(coder aDecoder: NSCoder) { // 2 super.init(coder: aDecoder) // must call parent's protocol's required function self.initialize() // called last, initialize our own properties } convenience init() { // 3, called own function self.init(frame: CGRectZero) self.initialize() // called last, initialize our own properties } func initialize() { // initialize our own properties NSLog("common init") } } |
Create custom UIView from XIB
we convenience the required protocol function to call our own designated init function. In that init function,
we set up own property, then call parent’s protocol required init function if coder is valid.
If not, we simply call parent’s designated function.
|
1 2 3 4 5 6 7 8 9 10 11 12 13 14 15 16 17 18 19 |
class View: UIView { var name : String required convenience init(coder aDecoder: NSCoder) { self.init(aDecoder) } init(_ coder: NSCoder? = nil) { self.name = "common init" if let coder = coder { super.init(coder: coder) // call parent's required init } else { super.init(frame: CGRectZero) // call parent's designated init } } } |
Init Singletons
Use a static variable to signify that this class only has one instance of this type. Then we simply over-ride
the parent’s init function with our own init. When over-riding, make sure to call the parent’s function first.
|
1 2 3 4 5 6 7 |
class Singleton : NSObject { static let sharedInstance = Singleton() override init() { super.init() } } |
Required Initializers
A required initializer is a required function of a protocol. When a class conforms to that protocol, the required initializer function makes a guarantee that you can initialize the class type (or any of its sub types) with that initializer.
In other words, if you have an initializer function in a protocol and you conform a class to that protocol, you have to use required (if it’s a class) because that protocol guarantees that the initializer is present on that class, and any of its subclasses.
When you use required on an initializer of a class, that signals that all of its subclasses can also be initializer using that method. This means you also need to add that initializer to any of its subclasses.
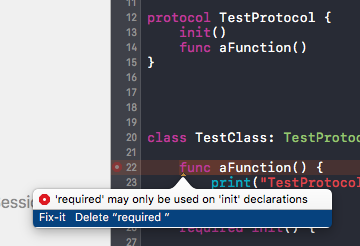
Say a protocol defines an init function. This means whatever class that conforms to TestProtocol is “required” to implement it.
|
1 2 3 |
protocol TestProtocol { init() } |
Thus, if we have a TestClass that conforms to TestProtocol, we must use required.
|
1 2 3 4 5 |
class TestClass: TestProtocol { required init() { } } |
In other words, the required keyword must be present because any subclasses of TestClass must also provide init() (because they also conform to TestProtocol) .
Note that the keyword required is only allowed on “init” declarations
Having a required initializer allows you to initialize a class without knowing what it is at compile time, which is useful for a variety of reasons:
|
1 2 |
let classType: TestProtocol.Type = TestClass.self let object = classType.init() |
Required initializers and designated initializers are not really related, though the associated keywords required and convenience are both used to specify restrictions on subclasses.
Having a required initialiser allows you to initialise a class without knowing what it is at compile time, which is useful for a variety of reasons. We take on the object TestClass.self and put it into constant variable classType. Then we assign it to constant variable object, and then just call the init of that class type.
|
1 2 |
let classType: TestProtocol.Type = TestClass.self let object = classType.init() |
If your class conformed to multiple protocols, each with a different initializer for example, each of those initializers must also be required. For example, in the below example, we must conform to superclass TestClass’s protocol TestProtocol’s init method.
Then, since we conform to OtherProtocol, we must implement its required init method also.
|
1 2 3 4 5 6 7 8 9 10 11 12 13 14 15 |
protocol OtherProtocol { init(thing: Int) } class OtherClass: TestClass, OtherProtocol { let thing: Int required init() { // Required from superclass/its protocol self.thing = 0 } required init(thing: Int) { // Required from OtherProtocol self.thing = thing } } |
You can implement a required initializer on a class by initializing a type of a class which isn’t known at compile time. This is great for when you loop through an array, and there is a lot of subclass objects, and you don’t know which type is going to be used.
For example, say we have base class Animal. And its subclasses are Horse, Tiger, Giraffe. You want to go through that array, and call an init on them. Problem is, you don’t know what animal is in each array’s element.
So all you have to do is initialize the base class type “Animal” as temporary variable, and simply point to all the subclass animals.
Then just call init on the base class type “Animal”, which will then return the subclass animal instance.
|
1 2 3 4 5 6 7 8 9 10 11 12 13 14 15 16 17 18 19 20 21 22 23 24 |
class BaseClass { let value: Int required init(value: Int) { self.value = value } } class SubClass: BaseClass { required init(value: Int) { // Required from superclass super.init(value: value) // Must call designated initializer of superclass } } // initialize the base class type "Animal" as temporary variable let someBaseClassType: BaseClass.Type = SubClass.self // then assign it to an incoming subclass (i.e tiger, giraffe, etc) // then when you call init method on the base class type "Animal", it will know to hit up the init in either tiger, giraffe, or // whatever animal it is. That's why we say, at run time, we're not sure what type the subclass will be, but by using the base class // we can call required functions on it. // this will call the subclass's init first, then from subclass's init // it will call the superclass init let someBaseClassInstance = someBaseClassType.init(value: 1) |
Designated Initializers
Like most constructs in Swift, designated initializers are aptly named and do exactly what they say they do. They are the main initializers to be used for a class. A class must have one designated initializer, but it is not limited to one. It can have multiple if necessary, but most classes only have one.
To create a designated initializer, it is just the init keyword, with the parameters afterwards, and then the code inside the curly braces. Designated initializers tend to set all of the properties up and let the user send in values for each.
Let’s take a look at a designated initializer:
|
1 2 3 4 5 6 |
init(sender: String, recipient: String) { self.sender = sender self.recipient = recipient timeStamp = NSDate() } |
In other words, a designated initializer is one which isn’t a convenience initializer (i.e, marked with convenience).
A designated initializer must make sure that all properties of the class have a value before the initializer finishes (or a super initializer is called). Convenience initializer only don’t have this requirement because they must themselves call a designated initializer.
|
1 2 3 4 5 6 7 8 9 10 11 |
class OtherSubClass: BaseClass { convenience required init(value: Int) { self.init() // Must call designated initializer of THIS class } // designated initializer init() { super.init(value: 0) // Must call designated initializer of superclass } } |
Convenience Initializers
A convenience initializer often has some of those hard coded, and thus can take less parameters. The developer usually write’s a convenience initializer to set some defaults that are appropriate to a special use case.
|
1 2 3 |
convenience init(sender: String) { self.init(sender: sender, recipient: sender) } |
The main difference in their syntax, is that convenience initializers have the convenience keyword before the init. Otherwise they are exactly the same. Once inside our convenience initializer that only takes the sender as a parameter, we just give that parameter to the designated initializer as both the sender and the recipient, since this Message is being used more like a note.
Rules for Designated and Convenience Initializers
A Swift class must initialize its own (non-inherited) properties before it calls its superclass’s designated initializer.
Swift has three rules as to how designated and convenience initializers relate to each other. Instead of trying to paraphrase them, I’m just going to quote Apple’s iBook directly:
- A designated initializer must call a designated initializer from its immediate superclass.
- A convenience initializer must call another initializer from the same class.
- A convenience initializer must ultimately call a designated initializer.
|
1 2 3 4 5 6 7 |
// init is this class's designated initializer. // it calls a designated initializer of its superclass init(content: String, sender: String, recipient: String) { self.content = content super.init(sender: sender, recipient: recipient) } |
In rule 2, you see that it just says that a convenience initializer must call another initializer. It doesn’t say dedicated initializer there, just any initializer. If you want, you can have several convenience initializers that handle a small part of the initialization, and just call them in a chain
|
1 2 3 4 5 6 7 8 9 |
convenience init() { //Rule 2: Calling another initializer in same class self.init(content: "") } convenience init(content: String) { //Rule 2: Calling another initializer in same class self.init(content: content, sender: "Myself") } |
|
1 2 3 4 |
convenience init(content: String, sender: String) { //Rule 2 and 3: Calling the Designated Initializer in same class self.init(content: content, sender: sender, recipient: sender) } |
Unlike subclasses in Objective-C, Swift subclasses do not inherit
their superclass initializers by default.
for example, if you were to subclass NSObject, and in your current class’s code you go
|
1 |
self.init() |
If you do not write your own init, it would execute NSObject’s init
in swift, if you were to call init(), (and assuming you did not implement it), it would not go anywhere. It is undefined
|
1 2 3 4 5 6 7 8 9 10 11 12 13 14 15 16 17 18 19 20 21 22 23 24 25 |
// Bar is subclass, Foo is superclass class Bar : Foo { var bar: String // we also initialize Foo's properties init(foo: String, bar: String) { //we need to call super.init or else compiler will complain self.bar = bar // IMPORTANT: you might expect that Bar has inherited Foo's initializer, // init(a: Int). But it doesn't. // And how could it? How does Foo's init(a: Int) know how // to assign a value // to the b variable that Bar added? It doesn't. // that's why we must call init of super class Foo like so: super.init(foo: foo) } } // let x = Bar(foo:3) //can't do this, because we can't just inherit superclass's init |
if this was objc, it would inherit Foo’s initializer, which then would then auto-initialize Bar’s bar property to nil
however, in swift, bar is an NON-OPTIONAL, which means it must contain a value, and can never be nil.
Ultimately, it all boils down to the basic understanding that Swift’s initializers play by a slightly different set of inheritance rules which means you’re not guaranteed to inherit initializers from your superclass. This happens because superclass initializers can’t know about your new stored properties and they couldn’t instantiate your object into a valid state