ref – https://www.cmssource.co.uk/blog/2012/June/basic-sitecore-development-tutorial-part-3-visual-studio-sitecore-connection
Sitecore Rocks is a VS plugin that allows us to easily access our Sitecore content from within VS. It saves time by bypassing the Sitecore development centre. The following steps highlight how to hook up sitecore rocks with our currently static Sitecore web project.
After installing Sitecore Rocks, a “Sitecore” menu will appear in your visual studios. Click on on it to open the sitecore dialog box.
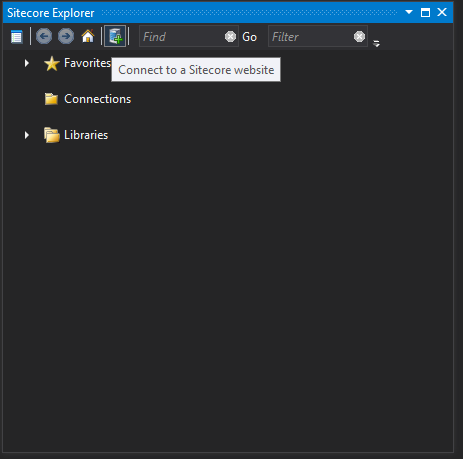
- Click on the ‘Connect to a Sitecore Website’ button as shown on the right. The connection dialog box will open up.
- Select the ‘Hard-Rock Web Service’, which is specifically for the newer editions of sitecore, from the Data Provider drop-down.
- Type the name of your website into the Host Name category, in this case: sitecorex.
- Enter‘sitecore\admin’ into the User Name category and enter ‘b’ into the Password field.sitecore rocks connection
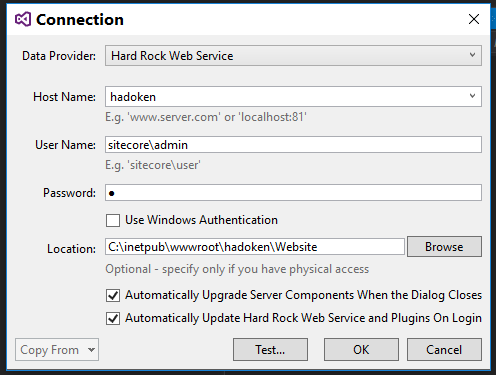
Browse for the location of the Website folder in the root directory of your Sitecore website and tick the ‘Automatically Upgrade Server Components When the Dialog Closes’ checkbox.
Hit the Test button. You should receive a pop-up saying ‘Yes, it works!’ if you’re successful.
If you’re prompted with a series of dialog boxes regarding upgrading the server components, click OK then check the Sitecore.Rocks.Server component checkbox, then click Update when prompted to update server components. Select the Website folder of the SitecoreX website (C:\inetpub\wwwroot\hadoken\Website) and click OK.
If a ‘Yes, it works!’ dialog box appears you’re successful. Click OK and you should see the sitecorex website content icon with drill-down ability appear on the left. You should be able to go into the contents of the website, in the master database, as it is shown within the Sitecore Content Editor.