Basics
- Declare an Array data structure
- numberOfSectionsInTableView
- numberOfRowsInSection
- cellForRowAtIndexPath
1. Declare an Array data structure
The table always matches an array(s) of some sort to represent data.
Each row matches up to an element in the array.
|
1 2 3 4 5 6 7 8 |
- (void)viewDidLoad { NSLog(@"%s", __FUNCTION__); [super viewDidLoad]; if (!maTheData) { maTheData = [[NSMutableArray alloc] initWithObjects:@"Comets", @"Asteroids", @"Moons", nil]; } } |
2. numberOfSectionsInTableView
The first order things is to let the table know how many sections we will represent. Each table can contain m sections.
Each sections can contain n rows. For simplicity purposes, we’ll designate only 1 section for our table.
Usually, use one array to represent one section. Each section will have n number of rows, which matches up to n number of elements in that array.
|
1 2 3 4 5 |
- (NSInteger)numberOfSectionsInTableView:(UITableView *)tableView { NSLog(@"%s", __FUNCTION__); return 1; } |
3. numberOfRowsInSection
Now, we simply specify the number of rows for each section. Each section usually represent an array, where n elements in that array
matches up to n number of rows in that section.
|
1 2 3 4 5 6 7 |
- (NSInteger)tableView:(UITableView *)tableView numberOfRowsInSection:(NSInteger)section { NSLog(@"%s", __FUNCTION__); if(section==0) return [maTheData count]; else return 0; } |
4. cellForRowAtIndexPath
|
1 2 3 4 5 6 7 8 9 10 11 12 13 14 |
- (UITableViewCell *)tableView:(UITableView *)tableView cellForRowAtIndexPath:(NSIndexPath *)indexPath { NSLog(@"%s", __FUNCTION__); UITableViewCell *cell = (UITableViewCell*)[tableView dequeueReusableCellWithIdentifier:@"tvcItems"]; if(cell==nil) { NSLog(@"%s - Creating new cell", __FUNCTION__); cell = [[UITableViewCell alloc] initWithStyle:UITableViewCellStyleDefault reuseIdentifier: @"tvcItems"]; } [cell.textLabel setText:[maTheData objectAtIndex:[indexPath row]]]; return cell; } |
The concept here is that the UITableView keeps a list of reusable cells.
At first, before showing the rows, it will have nothing. So dequeueReusableCellWithIdentifier will return nil. If you run the app, you’ll see the log show that it creates the cell:
-[RootViewController tableView:cellForRowAtIndexPath:] – Creating new cell
row 0 setting text
[RootViewController tableView:cellForRowAtIndexPath:] – Creating new cell
row 1 setting text
-[RootViewController tableView:cellForRowAtIndexPath:] – Creating new cell
row 2 setting text
In the case of UITableView building new cells for displaying the rows, we get the cell variable reference and point it to a newly created
UITableViewCell object allocated on the heap. We only do this if the cell returned is nil.
Once it creates the cell, it will set the cell’s properties.
Notice there is no ‘else’. That’s because whenever dequeueReusableCellWithIdentifier return a valid cell to be displayed, we always want to make sure the properties are correct, by assigning them.
Always reset all content when reusing a cell
https://developer.apple.com/library/ios/documentation/UserExperience/Conceptual/TableView_iPhone/TableViewCells/TableViewCells.html
An example of this is if you pull the table up and the rows disappear from the screen.
Once the table bounces back on the visible screen, you’ll see logs like this:
row 0 setting text
row 1 setting text
That’s because when dequeueReusableCellWithIdentifier returns valid cells, you need to always reset the contents of the cell when the reusable cell is returned.
Cells and Table View Performance
The proper use of table view cells, whether off-the-shelf or custom cell objects, is a major factor in the performance of table views. Ensure that your application does the following three things:
Reuse cells. Object allocation has a performance cost, especially if the allocation has to happen repeatedly over a short period—say, when the user scrolls a table view. If you reuse cells instead of allocating new ones, you greatly enhance table view performance.
Avoid relayout of content. When reusing cells with custom subviews, refrain from laying out those subviews each time the table view requests a cell. Lay out the subviews once, when the cell is created.
Use opaque subviews. When customizing table view cells, make the subviews of the cell opaque, not transparent.
Select Row
When you click on a row, this method will be triggered. Then call method setEditing on the table view object. Once you set it to YES, the row will animate its set settings where your deletion option appears on the left, and the move row button appears on the right.
|
1 2 3 4 5 |
- (void)tableView:(UITableView *)tableView didSelectRowAtIndexPath:(NSIndexPath *)indexPath { NSLog(@"%s", __FUNCTION__); [tableView setEditing:YES animated:YES]; } |
Click and drag the first row’s move icon for a row and move it to the very bottom. Basically we’ll be switching the topmost row with the bottom most row.
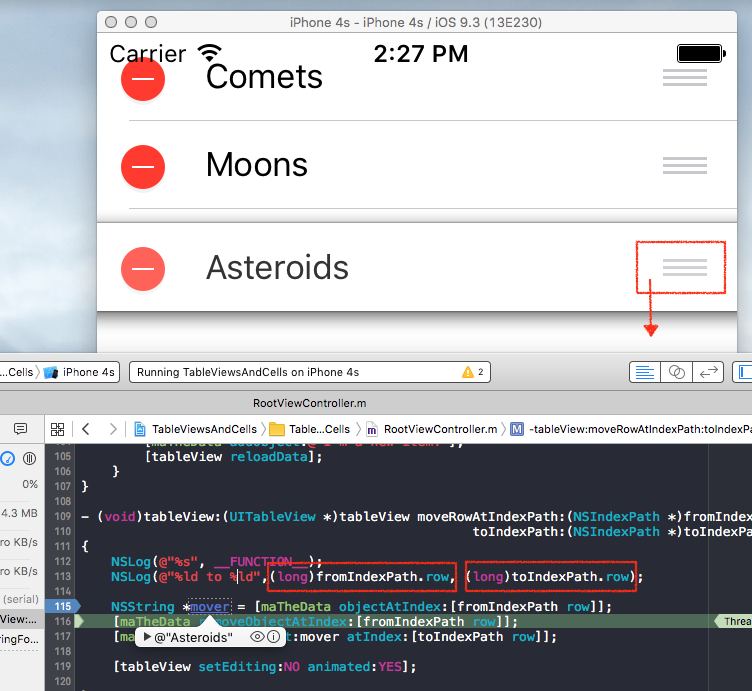
You can see that by using the fromIndexPath.row, we can get the string by our data array. We use the NSArray’s methods to manipulate the data so that it reflects what’s happening on the UI.
Namely, use removeObjectAtIndex at from index path, and then insertObject on the row string at index toIndexPath.row.
Finally, we use a NO on setEditing to tell the tableView to finish.
Commit your Edit
Once in edit mode, you will commit on a task. A common one is to delete the row. Once you click on the Delete button, you’ll hit the commitEditingStyle:forRowAtIndexPath method in which you commit your deletion.
|
1 2 3 4 5 6 7 8 9 10 |
- (void)tableView:(UITableView *)tableView commitEditingStyle:(UITableViewCellEditingStyle)editingStyle forRowAtIndexPath:(NSIndexPath *)indexPath { NSLog(@"%s", __FUNCTION__); if (editingStyle == UITableViewCellEditingStyleDelete) { // Delete the row from the data source [maTheData removeObjectAtIndex:[indexPath row]]; // Delete row using the cool literal version of [NSArray arrayWithObject:indexPath] [tableView deleteRowsAtIndexPaths:@[indexPath] withRowAnimation:UITableViewRowAnimationFade]; } } |
When the delete button is selected, it will hit commitEditingStyle:forRowAtIndexPath: method where the editingStyle is UITableViewCellEditingStyleDelete.
From there, its the same as moving rows, where you manipulate your array. You remove the object at the data source, then call deleteRowsAtIndexPaths on the UI tableview object.
Once the deletion takes place, the tableview will redraw all the rows, thus, it will go through numberOfSectionsInTableView: and tableView:numberOfRowsInSection: to recalculate how many elements of the array it should show.
Adding a Insertion Row
Adding an insertion row involves 3 steps
1. Return Insert macro for Row
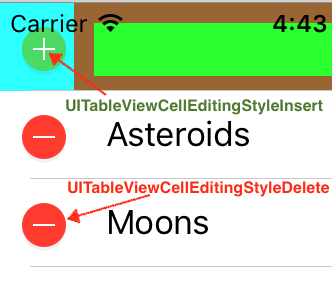
We want to add a row specifically for entering data and inserting that data into our table. Hence, let’s just designate the first row for that. Hence,
we specify in method editingStyleForRowAtIndexPath, where we return the insert macro for the 0th row to tell the table view to show an “Insert” button when the edit mode is on.
For all other rows, show the delete button when the edit mode is on.
|
1 2 3 4 5 6 7 8 9 10 11 |
- (UITableViewCellEditingStyle)tableView:(UITableView *)tableView editingStyleForRowAtIndexPath:(NSIndexPath *)indexPath { if(indexPath.row==0) { // conditional for inserting return UITableViewCellEditingStyleInsert; } else { // conditional for deleting return UITableViewCellEditingStyleDelete; } } |
Then in your commitEditingStyle:forRowAtIndexPath method, use an option where if the editing style is for insertion
we add a property NSString where it points to the string to be added
|
1 2 3 4 5 6 7 8 9 10 11 12 13 |
- (void)tableView:(UITableView *)tableView commitEditingStyle:(UITableViewCellEditingStyle)editingStyle forRowAtIndexPath:(NSIndexPath *)indexPath { NSLog(@"%s", __FUNCTION__); if (editingStyle == UITableViewCellEditingStyleDelete) { //deletion code } else if (editingStyle == UITableViewCellEditingStyleInsert) { [maTheData addObject:self.toInsertString]; [tableView reloadData]; } } |
2. Setting up a Custom Row to receive data
One easy way to do this is to create a custom cell with a textfield in there that receives a string.
|
1 2 3 4 5 |
@interface InsertionCell : UITableViewCell { } @property (nonatomic, strong) UITextField * insertionField; @end |
|
1 2 3 4 5 6 7 8 9 10 11 12 13 14 15 16 17 18 19 20 21 22 23 24 25 26 27 |
@interface InsertionCell(){ } @end @implementation InsertionCell - (id)initWithStyle:(UITableViewCellStyle)style reuseIdentifier:(NSString *)reuseIdentifier { self = [super initWithStyle:style reuseIdentifier:reuseIdentifier]; if (self) { self.insertionField = [[UITextField alloc] initWithFrame: CGRectMake( 48, 10, self.bounds.size.width * 0.6, self.bounds.size.height * 0.6)]; [self.insertionField setBackgroundColor:[UIColor greenColor]]; self.insertionField.font = [UIFont fontWithName:@"Arial" size:8.0f]; [self addSubview:self.insertionField]; [self setBackgroundColor:[UIColor cyanColor]]; [self.contentView setBackgroundColor:[UIColor brownColor]]; } return self; } |
3. ViewController observe UITextFieldTextDidChangeNotification messages from UITextField
Insert a property InsertionCell, where it will point to the 0th row of type InsertionCell.
|
1 |
@property (nonatomic, strong) InsertionCell * insertionCell; |
You assign it in cellForRowAtIndexPath, where when after 0th cell is created, you simply
assign a reference to it so we can keep track of it.
|
1 2 3 4 5 6 7 |
if(cell==nil) { NSLog(@"%s - Creating new cell", __FUNCTION__); cell = [[InsertionCell alloc] initWithStyle:UITableViewCellStyleDefault reuseIdentifier: @"insertItems"]; self.insertionCell = cell; NSLog(@"cell address is: %p", cell); } |
Then, we register for the UITextFieldTextDidChangeNotification notifications on
textfield of the insertion Cell:
|
1 2 3 4 5 6 7 8 9 10 11 12 |
- (void)viewDidLoad { NSLog(@"%s", __FUNCTION__); [super viewDidLoad]; ... ... [[NSNotificationCenter defaultCenter] addObserver:self selector:@selector(textUpdated:) name: UITextFieldTextDidChangeNotification object:self.insertionCell.insertionField]; } |
This means that whenever the user enter a character, the UITextfield will send UITextFieldTextDidChangeNotification,
in which the ViewController will observer.
It will run textUpdated: method, like so:
|
1 2 3 4 5 6 |
-(void)textUpdated:(NSNotification*)notification { UITextField * temp = (UITextField*)[notification object]; NSLog(@"%@", temp.text); self.toInsertString = temp.text; NSLog(@"%p", self.toInsertString); } |
The notification message will contain the UITextField with its text. Hence we just have a NSString property point to that text.
When the green plus button is clicked, it will run to commitEditingStyle:forRowAtIndexPath:, check that editingStyle is UITableViewCellEditingStyleInsert and add the string to the data source array. Then it refresh the data by calling the table view’s reloadData method method.