- https://reactnative.dev/blog/2017/03/13/introducing-create-react-native-app
- https://reactnative.dev/docs/next/communication-ios
We first install create-react-native-app module:
npm install -g create-react-native-app
We then create the app:
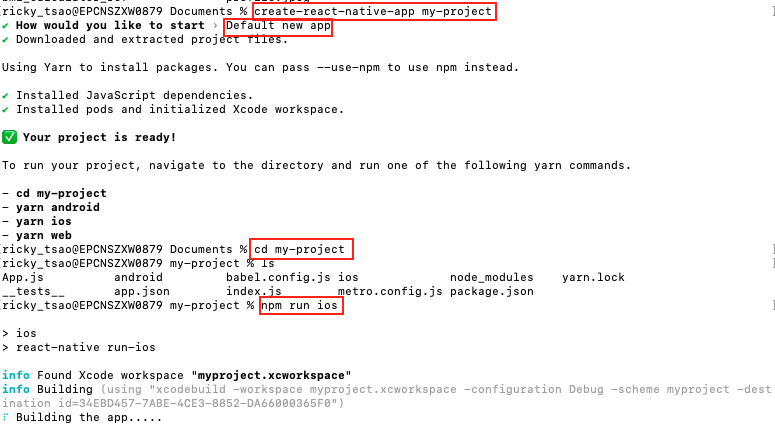
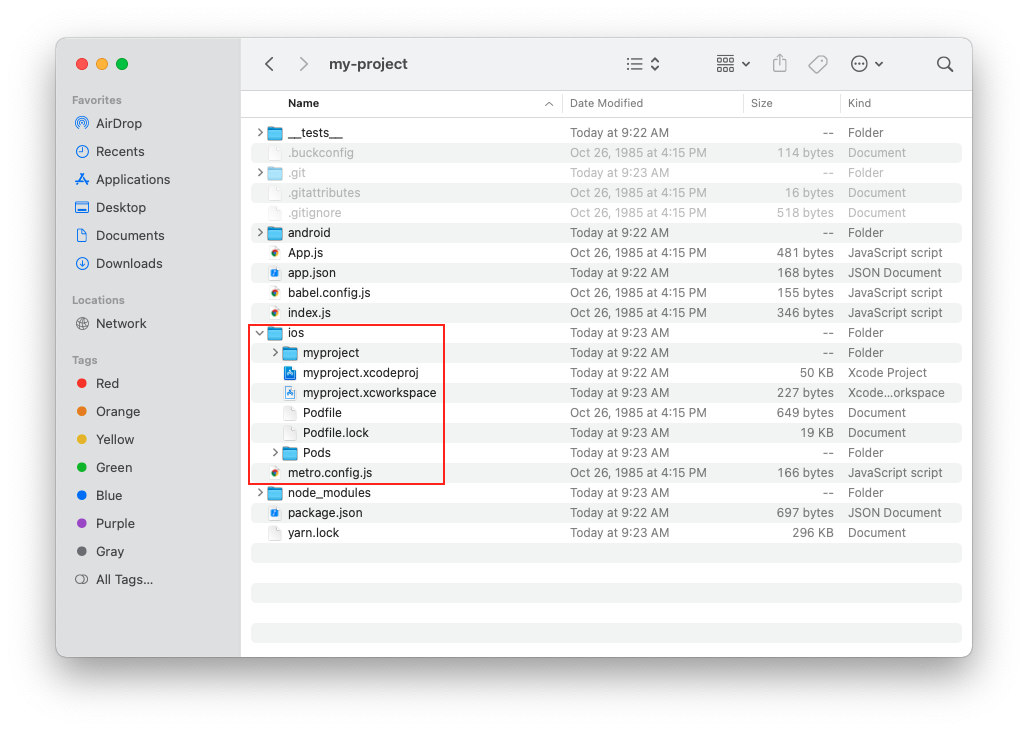
Look at the directory. You’ll see the iOS folder with its xcode files.
Running the iOS simulator
npm run ios
It’ll take a few minutes for the app to build. You’ll see a terminal pop up with the title “Metro.node launcher package”. Then your simulator will start and the app will install and run.
Implementing the app
Features
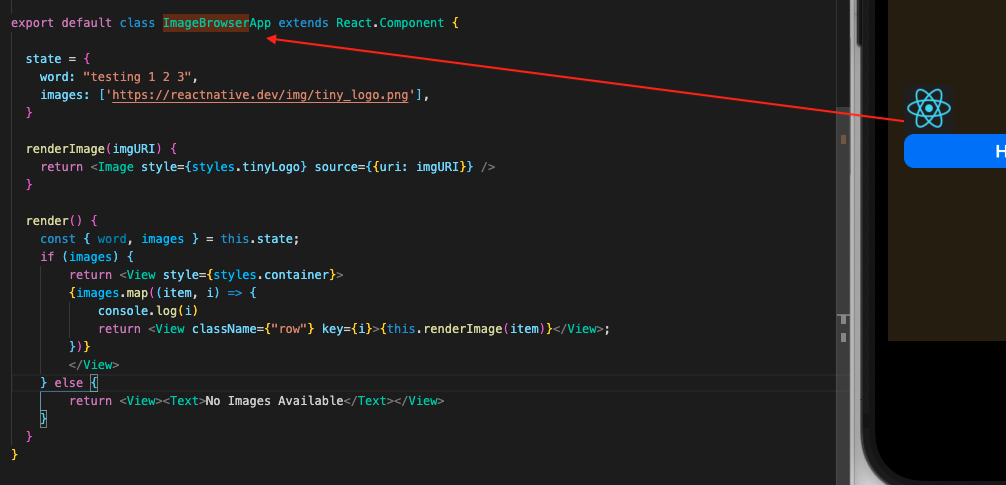
We first create a file called ImageBrowserApp.js
Its a class component, where we simply display an image.
We render this image through JSX Image tag.
If no image URLs are given, we simply return ‘No Images Available’.
|
1 2 3 4 5 6 7 8 9 10 11 12 13 14 15 16 17 18 19 20 21 22 23 24 25 26 27 28 29 30 31 32 33 34 35 36 37 38 39 40 41 42 |
import React from 'react'; import { View, Image, Text, StyleSheet } from 'react-native'; const styles = StyleSheet.create({ container: { paddingTop: 50, }, tinyLogo: { width: 50, height: 50, }, logo: { width: 66, height: 58, }, }); export default class ImageBrowserApp extends React.Component { state = { word: "testing 1 2 3", images: ['https://reactnative.dev/img/tiny_logo.png'], } renderImage(imgURI) { return <Image style={styles.tinyLogo} source={{uri: imgURI}} /> } render() { const { images } = this.state; if (images) { return <View style={styles.container}> {images.map((item, i) => { console.log(i) return <View className={"row"} key={i}>{this.renderImage(item)}</View>; })} </View> } else { return <View><Text>No Images Available</Text></View> } } } |
In index.js, make sure we use AppRegistry to register this component like so:
|
1 2 3 4 5 6 7 8 9 10 11 |
import 'react-native-gesture-handler'; import { registerRootComponent } from 'expo'; import App from './App'; import ImageBrowser from './ImageBrowserApp'; import { AppRegistry } from 'react-native'; // registerRootComponent calls AppRegistry.registerComponent('main', () => App); // It also ensures that whether you load the app in Expo Go or in a native build, // the environment is set up appropriately registerRootComponent(App); AppRegistry.registerComponent( 'ImageBrowserApp', () => ImageBrowser); |
In your App.js, you can use it like so:
App.js
|
1 2 3 4 5 6 7 8 9 10 11 12 13 |
export default function App() { return ( <> <View style={styles.screenContainer}> <ImageBrowser /> <AppButton title="Hey there!" onPress ={() => {...} /> </View> ); } |
When you export it to iOS, it will look like this:
In the native iOS side, we can also instantiate ImageBrowserApp to be used as a view.
This is made possible when we registered the component with the name ImageBrowserApp
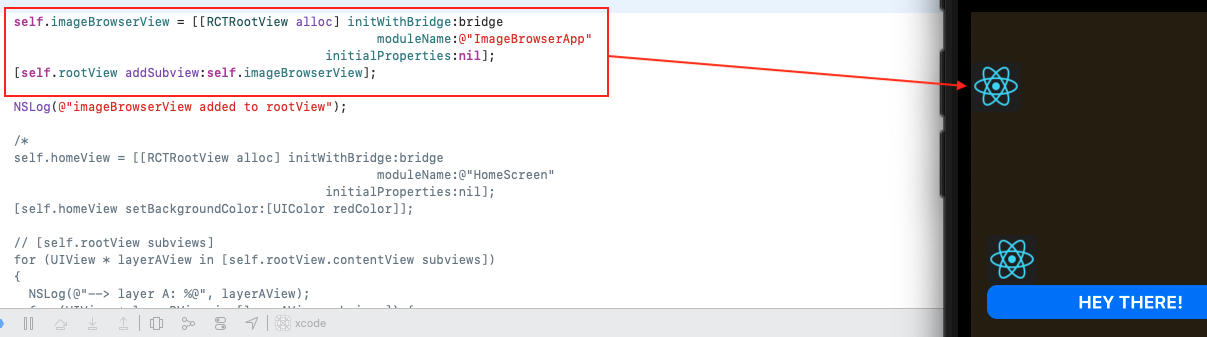
So in AppDelegate, we simply create a RCTRootView and initialize the module name to ImageBrowserApp.
Then we add it to the rootView.
iOS side
AppDelegate.h
|
1 2 3 4 5 6 7 8 9 |
#import <Foundation/Foundation.h> #import <EXUpdates/EXUpdatesAppController.h> #import <React/RCTBridgeDelegate.h> #import <UIKit/UIKit.h> #import <UMCore/UMAppDelegateWrapper.h> @interface AppDelegate : UMAppDelegateWrapper <RCTBridgeDelegate, EXUpdatesAppControllerDelegate, RCTBridgeModule> @end |
AppDelegate.m
|
1 2 3 4 5 6 7 8 9 10 11 12 13 14 15 16 17 18 19 20 21 22 23 24 25 26 27 28 29 30 31 32 33 34 35 36 37 38 39 40 41 42 43 44 45 46 47 48 49 50 51 52 53 54 55 56 57 58 59 60 61 62 63 |
#import "AppDelegate.h" #import <React/RCTBridge.h> #import <React/RCTBundleURLProvider.h> #import <React/RCTRootView.h> #import <React/RCTLinkingManager.h> #import <React/RCTDevLoadingView.h> #import <React/RCTLog.h> // Use the RCTLog APIs from React #import <UMCore/UMModuleRegistry.h> #import <UMReactNativeAdapter/UMNativeModulesProxy.h> #import <UMReactNativeAdapter/UMModuleRegistryAdapter.h> #import <EXSplashScreen/EXSplashScreenService.h> #import <UMCore/UMModuleRegistryProvider.h> #if defined(FB_SONARKIT_ENABLED) && __has_include(<FlipperKit/FlipperClient.h>) #import <FlipperKit/FlipperClient.h> #import <FlipperKitLayoutPlugin/FlipperKitLayoutPlugin.h> #import <FlipperKitUserDefaultsPlugin/FKUserDefaultsPlugin.h> #import <FlipperKitNetworkPlugin/FlipperKitNetworkPlugin.h> #import <SKIOSNetworkPlugin/SKIOSNetworkAdapter.h> #import <FlipperKitReactPlugin/FlipperKitReactPlugin.h> ... ... RCT_EXPORT_MODULE(); RCT_EXPORT_METHOD(doSomethingInAppDelegate:(NSString *)msg) { NSLog(@"Xcode (AppDelegate) - %@", msg); } ... ... + (BOOL)requiresMainQueueSetup { return NO; } - (RCTBridge *)initializeReactNativeApp { RCTBridge *bridge = [[RCTBridge alloc] initWithDelegate:self launchOptions:self.launchOptions]; #if RCT_DEV [bridge moduleForClass:[RCTDevLoadingView class]]; #endif self.rootView = [[RCTRootView alloc] initWithBridge:bridge moduleName:@"main" initialProperties:nil]; self.rootView.backgroundColor = [[UIColor alloc] initWithRed:0.8f green:0.6f blue:0.2f alpha:0.2]; self.imageBrowserView = [[RCTRootView alloc] initWithBridge:bridge moduleName:@"ImageBrowserApp" initialProperties:nil]; [self.rootView addSubview:self.imageBrowserView]; UIViewController *rootViewController = [UIViewController new]; rootViewController.view = self.rootView; self.window.rootViewController = rootViewController; [self.window makeKeyAndVisible]; return bridge; } |