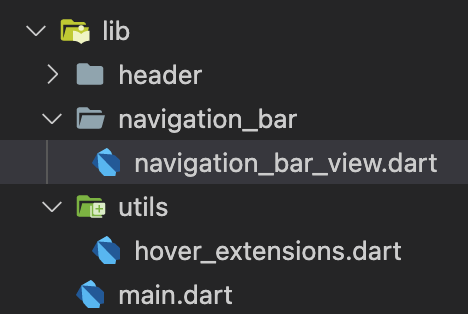
Go to the file and type stl + tab. Code generation will give you a class that extends a StatelessWidget. Let’s type NavigationBarView as the name of the class
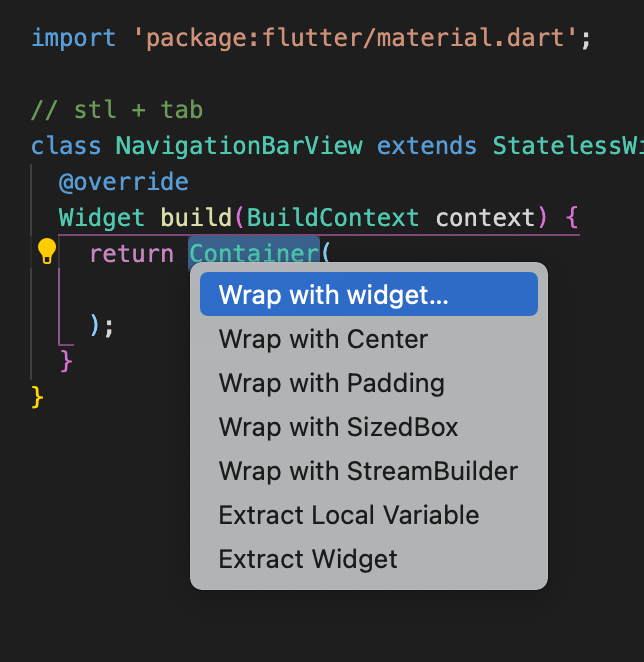
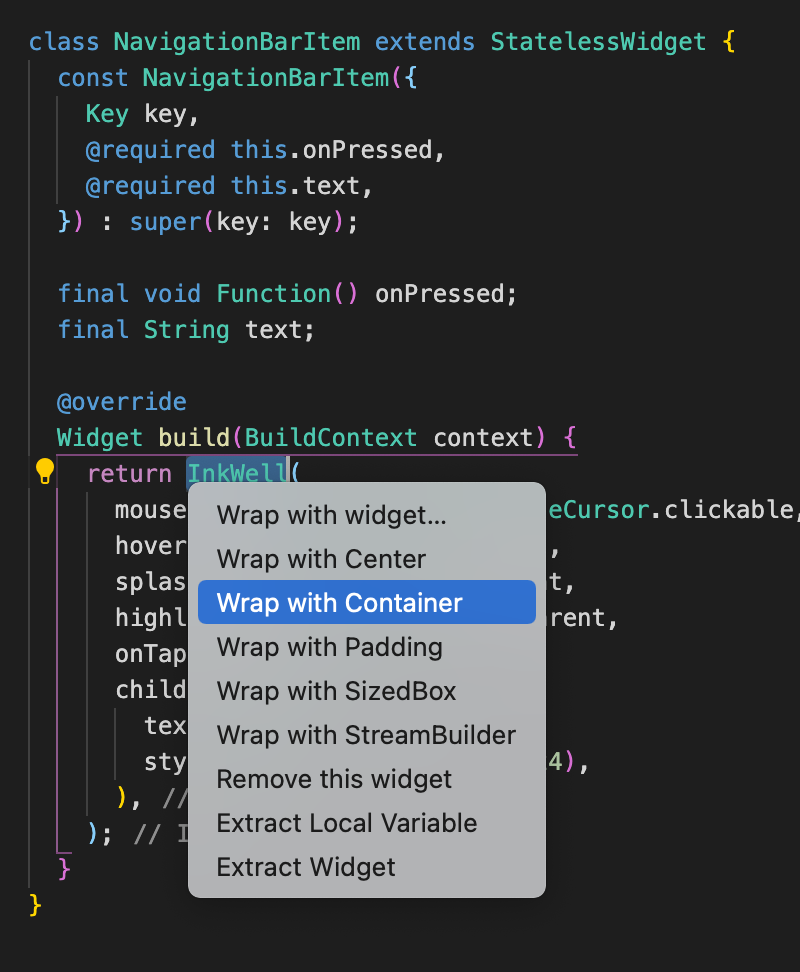
Now, we want to wrap the default Container with the ResponsiveBuilder. That way, our navigation bar will be responsive. Highlight Container and cmd + dot. Then select Wrap with Widget.
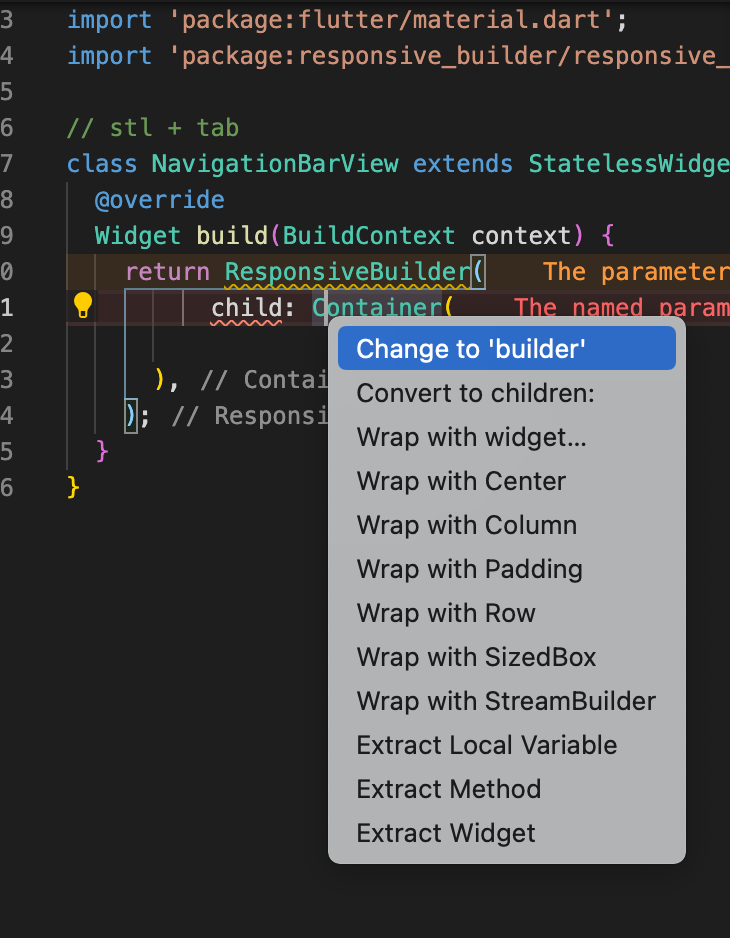
You will now see errors. ResponsiveBuilder constructor has property builder. There is no property child. In order to remedy this,
click on child and then cmd + dot. Select Change to ‘builder’
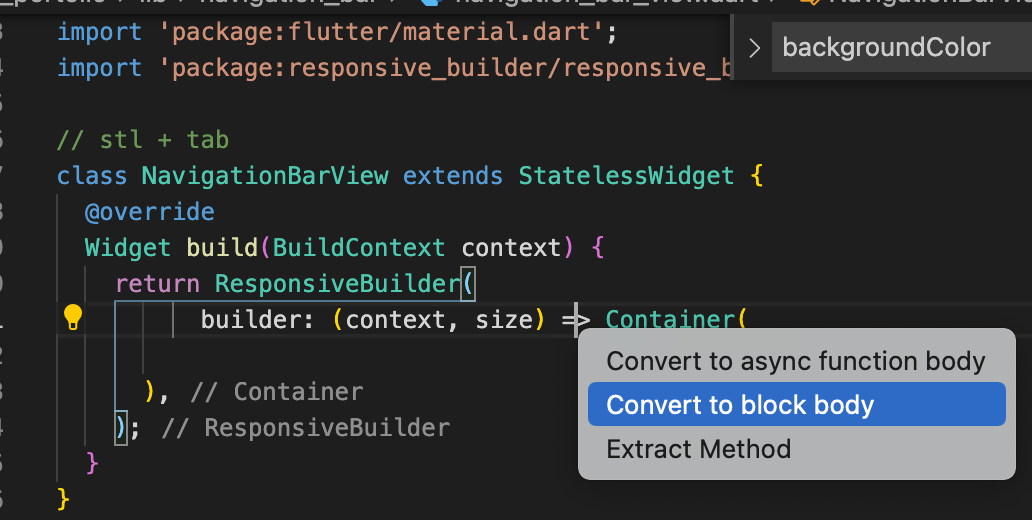
We need to provide a function with parameters context and size. We also want to put some code in there so we need the code to be a block body.
Then we fill in the code. We basically return a Container with static height and width, give it some padding and then add the widgets such as logo, spacer to space them out, and use InkWell to specify clicking dynamics.
|
1 2 3 4 5 6 7 8 9 10 11 12 13 14 15 16 17 18 19 20 21 22 23 24 25 26 27 28 29 30 31 32 33 34 |
import 'package:flutter/material.dart'; import 'package:responsive_builder/responsive_builder.dart'; // stl + tab class NavigationBarView extends StatelessWidget { @override Widget build(BuildContext context) { return ResponsiveBuilder( builder: (context, size) { return Container( height: 100, width: 1507, padding: const EdgeInsets.symmetric(horizontal: 20), child: Row( children: [ FlutterLogo(), Spacer(), InkWell( mouseCursor: MaterialStateMouseCursor.clickable, hoverColor: Colors.transparent, splashColor: Colors.transparent, highlightColor: Colors.transparent, onTap: () {}, child: Text( 'About me', style: TextStyle(fontSize: 24), ), ), ], )); }, ); } } |
Now, if you put the cursor over ‘About Me’, it’ll turn into a hand pointer and all the other click colors would be transparent.
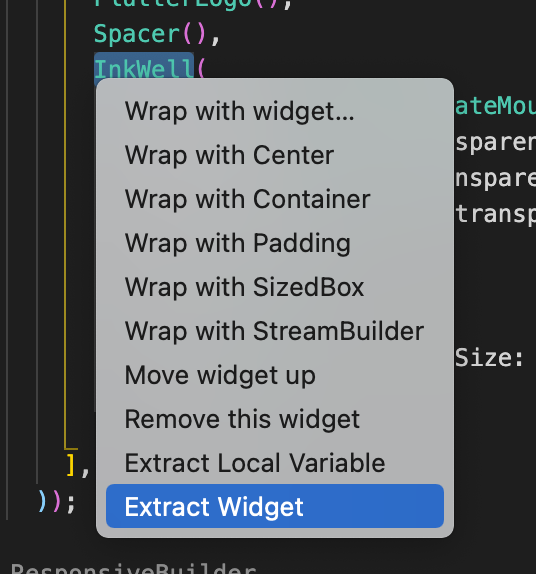
We can extract text as local variable:

Let’s extract our Inkwell as a widget and name it NavigationBarItem
Now each item looks fine, but we need to put some padding in between them. Let’s give each menu item a certain padding.
Refactor It
So in NavigationBarView, we use NavigationBarItem like so:
|
1 2 3 4 5 6 7 8 9 |
child: Row( children: [ FlutterLogo(), Spacer(), NavigationBarItem(onPressed: onPressed, text:text), NavigationBarItem(onPressed: onPressed, text:text), NavigationBarItem(onPressed: onPressed, text:text), ], )); |
it would be much better if we used a for loop.
But in order do this, let’s set things up first. We first create a class where it contains the navigationItem’s data. Specifically, text and Icon.
|
1 2 3 4 5 |
class NavigationItem { final String text; final Icon icon; NavigationItem(this.text, {this.icon}); } |
Once these data is set, we then use an array to denote all the menu item istances we want. Hence, using NavigationItem as data holder.
|
1 2 3 4 5 6 7 |
// indicate variable is global, use k final kNavigationItems = [ NavigationItem('Projects'), NavigationItem('Skills'), NavigationItem('About Me'), NavigationItem('Blog') ]; |
Finally, we instantiate NavigationBarItem and initialize it with the texts:
|
1 2 3 4 5 6 7 8 9 10 11 12 13 14 15 16 17 18 19 20 21 22 |
class NavigationBarView extends StatelessWidget { @override Widget build(BuildContext context) { return ResponsiveBuilder( builder: (context, size) { var onPressed = () => print('clicked me'); return Container( height: 100, width: 1507, padding: const EdgeInsets.symmetric(horizontal: 20), child: Row( children: [ FlutterLogo(), Spacer(), for (var item in kNavigationItems) NavigationBarItem(onPressed: onPressed, text: item.text), ], )); }, ); } } |
Now, the only thing left is to make sure our menu is responsive. If you try to shorten the width, you’ll see that we have an overflow.
In apps where it uses Material Design, where there is insufficient space to support tabs, drawers provide a handy alternative.
Material Drawer
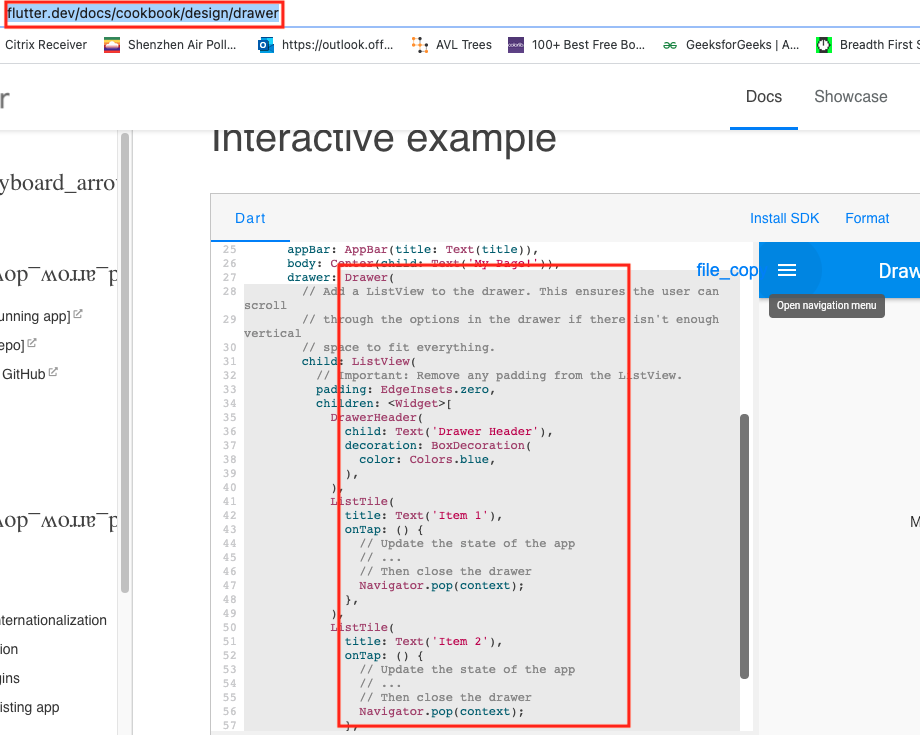
We first go to flutter’s page and find drawer. We copy the code.
We then create class DrawerView and paste the drawer code in there. Let’s wrap the Drawer with a widget of ResponsiveBuilder like we’ve done before.

Remove the child property and put builder property, where it takes on a function. This function passes in context, which we do not use, and size object.
We return the Drawer in this ResponsiveBuilder.
If the passed in size IS NOT mobile, then we simply return a SizedBox, which is basically an empty box. Because we’re on standard web size and don’t want to return anything as a DrawerView.
Else, we’ll be on mobile view, which in our case, we DO want to return a Drawer.
main.dart
|
1 2 3 4 5 6 7 8 9 10 11 12 13 14 15 16 17 18 19 20 21 22 23 24 25 26 27 28 29 30 31 32 |
class DrawerView extends StatelessWidget { @override Widget build(BuildContext context) { return ResponsiveBuilder( builder: (_, size) { if (!size.isMobile) return SizedBox(); // return empty box if not mobile return Drawer( child: ListView( padding: EdgeInsets.zero, children: <Widget>[ DrawerHeader( child: Text('Ricky T'), decoration: BoxDecoration( gradient: LinearGradient( colors: [Colors.white, Colors.blue], tileMode: TileMode.repeated), ), ), for (var item in kNavigationItems) ListTile( title: Text(item.text), onTap: () { Navigator.pop(context); }, ), ], ), ); }, ); } } |
If you were to analyze Drawer, we added some features.
1) A nice gradient, which points to an instance of BoxDecoration
2) For ListTile, we need to put text for the item. We use a for loop to display the Widget ListTile.
ListTile’s title then gets assigned to item.text.
Now, in main.dart, we see PortfolioView as our main display. We also see a SingleChildScrollView which houses all of our UI. Let’s add a endDrawer to it like so:
main.dart
|
1 2 3 4 5 6 7 8 9 10 11 12 13 14 15 16 17 18 19 |
class PortfolioView extends StatelessWidget { @override Widget build(BuildContext context) { final height = MediaQuery.of(context).size.height; final width = MediaQuery.of(context).size.width; return Scaffold( endDrawer: DrawerView(), body: SingleChildScrollView( child: Column( children: [ NavigationBarView(), HeaderView(), Container(height: height, width: width, color: Colors.blue), ], ), ), ); } } |
We then assign it to DrawerView().
So what this means is that we always have an endDrawer, represented by our DrawerView. If our app is NOT in mobile view, our DrawerView will return an empty box (SizedBox) as mentioned above. If its in mobile view, then we literally return a Drawer with its data and UI.
This is done when the drawer button of the navigation bar is pressed and it executes the openEndDrawer like so:
navigation_bar_view.dart
|
1 |
IconButton(icon: Icon(Icons.menu), onPressed: () => Scaffold.of(context).openEndDrawer()), |
Putting a logo and icon button in Navigation bar when its in Mobile
navigation_bar_view.dart
We need to modify our navigation bar a bit.
In our Responsive Builder of our NavigationBarView, we get a size object and we differentiate it by its isMobile property.
If it is mobile, we return a Container that is of 60 height. In other words, we return a navigation bar that is solely for mobile mode.
Its width is infinity. It has a row where we have a SizedBox of width 20 for padding, then a logo, then spacer to that it separates other stuff from the logo, then an Icon Button that represents a drawer.
The icon on this IconButton is a menu, and when pressed, it will open up the EndDrawer of our context.
navigation_bar_view.dart
|
1 2 3 4 5 6 7 8 9 10 11 12 13 14 15 16 17 18 19 20 21 22 23 24 25 26 27 28 29 30 31 32 33 34 35 36 37 38 39 40 41 42 |
class NavigationBarView extends StatelessWidget { @override Widget build(BuildContext context) { return ResponsiveBuilder( builder: (context, size) { print(context); // PortfolioView if (size.isMobile) { // if its mobile, we just return a container return Container( height: 60, width: double.infinity, child: Row( children: [ SizedBox(width: 20), FlutterLogo(), Spacer(), IconButton( icon: Icon(Icons.menu), onPressed: () => Scaffold.of(context).openEndDrawer()), ], ), ); // now if we go mobile mode, we'll see a blue bar on top } var onPressed = () => print('clicked me'); return Container( height: 100, width: 1507, padding: const EdgeInsets.symmetric(horizontal: 20), child: Row( children: [ FlutterLogo(), Spacer(), for (var item in kNavigationItems) NavigationBarItem(onPressed: onPressed, text: item.text), ], )); }, ); } } |
Notice that the context is PortfolioView. So it’s saying that we need to open up the endDrawer property.
Hence, in our PortfolioView, we specify DrawerView() for the endDrawer.
|
1 2 3 4 5 6 7 8 9 10 11 12 13 14 15 16 17 18 19 |
class PortfolioView extends StatelessWidget { @override Widget build(BuildContext context) { final height = MediaQuery.of(context).size.height; final width = MediaQuery.of(context).size.width; return Scaffold( endDrawer: DrawerView(), body: SingleChildScrollView( child: Column( children: [ NavigationBarView(), HeaderView(), Container(height: height, width: width, color: Colors.blue), ], ), ), ); } } |